Monday 16 December 2013

Christmas is on the way

Hello  friends and friends to be,
Christmas is coming in quicker than we think. Only another week and it will be here. I'm excited just thinking about it but wondering if I can get those last few cards out on time, the shopping done, those last few presents, and all the other things that have to be accomplished by the 25th of December .  Talking of cards here is my Christmas one for the Design Team over at the  Just for Fun Challenge .
 You all should have a go as its Just for Fun. There are a few prizes to be won and you can try out your skills as a card maker. 
You can also find a lot of ideas and inspiration from both the Design team and all the wonderful entries.
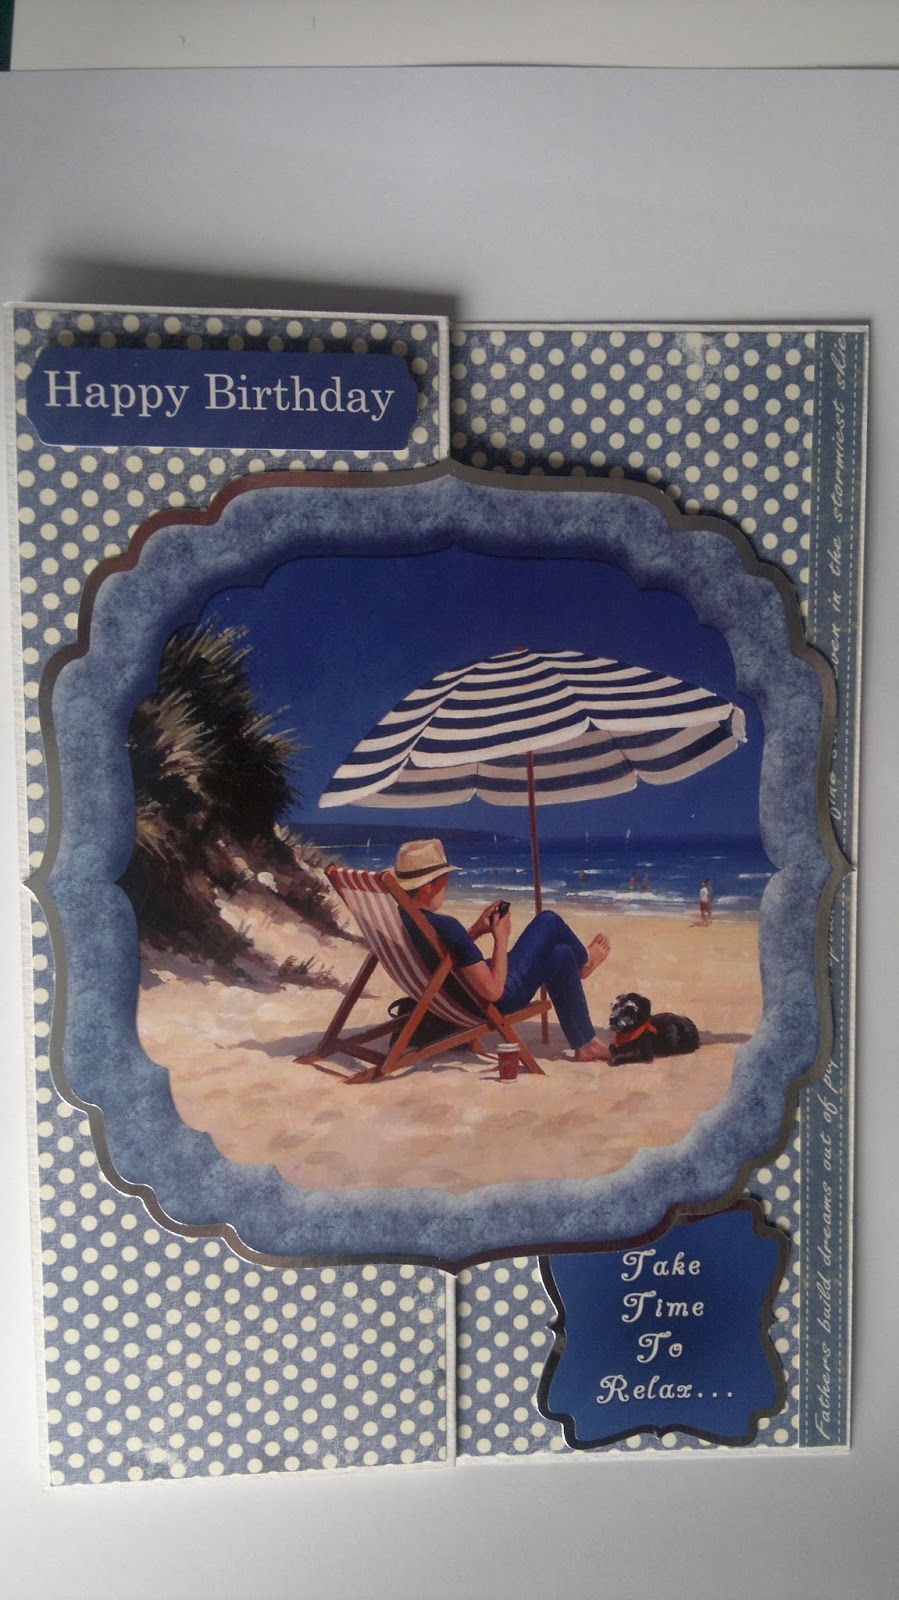
This is the card that I made to inspire you. It's a center stepper card. 


 I wrapped lace around the center front first and then layered a glittery ribbon and a red ribbon over the lace. The pretty topper is from Lili of the Valley and is layered onto gold mirri card and stuck on with foam pads. I decorated the sides to match the colours in the topper and added bows and gems to finish it off. 
Here is a side view to show the step and how it stands.

Inside I cut the insert to fit the stepper card and it fitted in nicely. Its just stuck at the top of each step and the center. 
The insert is inspired by my friend  Yvonne Tune.


 I hope you enjoyed looking at what I've done and hope it inspires you to try something different and to have fun in what you do. 
Have a wonderful week on the run up to Christmas and don't get too flustered.
Happy Days.
Kay XXX


Sunday 8 December 2013

Christmas Candle cards

Hi and welcome, I'm just posting a few photos today of some Tealight cards I have made. The light wasn't great this morning so the photo's could be better.


Happy Sunday, 
Kay XX

Wednesday 27 November 2013

Special card.

Hi everybody,
I hope you are all enjoying the cold crispy weather. Here is my card for today.
It was for a couple who are having two special birthdays. I started out with several different ideas but this is the card that made itself.
It is a gatefold card with two fronts attached.
The image in the oval is from Hunkydory as is the backing card and the car image is from Crafts u Print.
 Because it was an awkward size I had to make an envelope to fit it.


Open to reveal the verse inside.

Le grande envelope.

I hope you enjoyed this card.
Happy Day,
 Kay XXX

Friday 15 November 2013

Happy Day/Fantastic News

Hi everyone, 
I am delighted to say that I was asked to join the design team at the Just For Fun Challenge Blog.
I am really excited as this is my first post and its for this months challenge. I am on team B.
 For our November challenge, the theme is YOUR FAVOURITE COLOUR.You can make anything you like using your favourite colour. As your projects are likely to include more than one colour it would be great if you could specify on your blog post which is your favourite!
I choose Red as I love it for this time of the year,it's so festive.
And here is my Card,


The background is stamped and the dies on the corner are Spellbinders with Xcut die cut shapes matted and layered under the 3D image.


I hope you like it and it gives you some inspiration.

Happy Day,
Kay.


Wednesday 30 October 2013

Sepia Lighthouse Card.

Hello again,
Well the Autumn / Winter is well and truly here now,
 It is noticeably colder and as I write at 5pm the evening is drawing in. I'll need to put a light on shortly.
Over at a group called Mad Crafters Giggles on Facebook they had a challenge to make something using the word of the day which was 'Sepia'.
 I seen this as a bit of a challenge and knew I had a stamp I wanted to try out. It is a Kanban stamp and I used distress ink and promarkers for a little colour.
The other stamps are from different makers and I'll have to do a little detective work to get their names.
This is what I made.....


And another, coloured slightly differently but with the same colours. I haven't put a sentiment on the card yet so you are only getting to see the image for the moment.


Well, the light is on now and it's almost dark outside. 
Time to get supper and do a little more crafting.

Kay. XXX


Tuesday 15 October 2013

Tutorial, Surprise Box.

Hi everybody,
I came across this lovely box while looking for something else and I loved it so much that I have made several. Here is the link to the original post... Surprise box from Dawns Stamping Studio. 
She has a video to demonstrate it.


Anyway I learned a lot by making them and have changed the measurements to centimeters.
Further down I will putsome extra sizes and scorelines so you can make a bigger or a smaller box.

Just a few facts to start....
From an A4 sheet of card you can get a 5cm or 6cm sq box and the wrap around to finish it.
From an A4 sheet of card you can get a 7cm box but you won't have a piece left over to wrap around  it.
From a 30cm x 30cm  (12'' x 12'')sheet of card you will get two 5cm boxes.

I used 280g and 300g cardstock. If you use a lighter one then decorate all the sides with decorative paper....that will strengthen it.


6cm Surprise Box..


Cut your card stock 18cm by 24cm. Keep the long 3cm piece for the wraparound.


Using a scoreboard place the long side to the edge of the board and score at 6cm and 12cm.
Turn the card and with the short side at the edge of the board score the card at 3cm, 9cm, 15cm and 21cm.


Keeping the card where it is score at 5cm from the top edge to the first horizontal scoreline
 and from the second horizontal scoreline to the bottom of the card.
 Don't score through the center square.
Repeat this on the right hand side at 19cm. This is shown where the PINK lines are.


Fold all your main scorelines to the inside except the short ones. Crease them well to get a good crisp finish on your box.


Using a scissors cut into the short score lines where indicated in GREEN and along the indicated green lines. Take a little piece out at the corner of the short flap to make it easier to move the covers of the box.


Your piece should look like this now.


Next, fold in the middle box pieces 
and mark where you will put the glue
Glue the center box together.


I then measure the top of the box to see it it is 
square and so that the sides will come up over it.


Then folding the sides together check that they will fit over your center box. Adjust if they don't.


Fold back the little flaps and add glue to both 
(it is hard to put glue on the second one when the first is stuck)
Stick the little flaps on both sides so as to complete the side covers.


And there you have it!

Now for the wrap around....

Take the piece that you took off the long side 3cm by 31cm and starting at the bottom of the box, wrap it around gently creasing where it goes over the edges of the box. leaving an overlap to stick it together mark where you will glue. 

Note: have the band snug around the box but not so tight that you will not be able to get it off.
 If you are using a card band and paper on top - wrap and bend the card around first, then stick the decorative paper on top as it will have to go over the card. If you stick both together and then wrap around the box the card will buckle.....I found that out the hard way.


DECORATION
Decorate you box as desired. You can also use ribbon around the band and bows on top.
You can distress the edges or using an alcohol marker on the edge of the band.
Use lace, corner peel offs, buttons......
You can put a personal message or little verse inside the box lid. Have fun with it.


Box made with light card and decorated with a heavy paper.


DIFFERENT SIZES.
5cm sq box - Cut card 15cm by 20 cm.
                      Long side at edge of board and score at 5cm and 10cm.
                      Short side at board edge and score at 2.5cm,7.5cm, 12.5cm and 17.5cm. 
                      Then score at 3.5 and 16.5 for the flaps, top and bottom but not through the
                       center square.

7cm sq box - Cut card 21cm by 28cm.
                      Long side at edge of board and score at 7cm and 14cm.
                      Short side at board edge and score at 3.5cm, 10.5cm, 17.5cm and 24.5cm.
                      Then score at 5cm and 23cm for the flaps, top and bottom but not through 
                       the center square.


Well that is it, I welcome comments and I hope you have fun trying out some boxes. 
Happy Crafting,
Kay XX.


Monday 14 October 2013

Three Cards and a Box

Hi everyone,
Just showing you a few cards I've made.
This one was for a card swap here in Ireland entitled 'Halloween'. I hand drew the pumpkins and used a Christmas post card stamp. I went over the windows with silver pen and drew a cobweb with it also as can be seen in the close up photo.


And a baby card......


And another simple baby card.


And a little gift box.


That's it for now. I'm going to write a tutorial for the box now.
See you soon.
Kay XXX


Tuesday 8 October 2013

What I've been up to.

Hi y'all,
I've been to a Parchment and Colour workshop again with Karen Shaw and it was wonderful. We did two different colour pencil pieces -which I found I love doing- and some Parchment crafting also. 
The latter is driving me crazy due to my lack of focus. I have started the same piece 3 times and just keep loosing focus on the top pattern. I eventually sorta worked it to cover up all my mistakes but it is still a work in progress. 
Here is that piece. The Kingfisher was cut out and the main piece will eventually frame it. I still have a lot of snipping to do.


Here is a close up of the Kingfisher.


This is my other piece. It is a tiger's face on black card.
 A bit of a challenge but I managed to finish him.


I'll be back soon with some cards I've made. 
Love and laughter,
Kay.


Wednesday 4 September 2013

A quick post

Hi All,
just a quick post today. I made a couple of cards recently for a lady who was very thankful to a few people who looked after her husband and herself.

The backing card is Hunkydory.
The topper is from Le Suh.

Backing card is Hunkydory
Topper is from Hunkydory Floral enchantment collection.
Ribbon, doily, flowers etc from stash.
This card was inspired by a card Yvonne tune sent me in a swap.
 I loved the colours and the way she put the flowers together.

It's a quiet day here today and I'm finding it hard to motivate myself. I will do a little bit of tidying up in the craft room and then a little bit of dabbling in my crafty stash and see what I can come up with,
Enjoy the day yourselves and be thankful.
Kay XXX


Wednesday 28 August 2013

Back to school day

Well here I am again after unintentionally taking the summer off. I'm not making any promises after reneging on the last one but I will do my best to write here as often as I can.
I love this time of the year, I'm not sure why. I loved school and learning so maybe that is it and when it is still warm but with a little autumnal nip in the air it stirs something in me and its time to start something new or just to be creative again. 
I have completed a few things over the summer and have also moved into my daughters room as my craft room. She is now in her brothers old room, so we had a flurry of painting and decorating and moving of stuff ( All mine being dumped into her room so that she could move as quickly as possible). Everything is on top of each other and I reckon I could fill two rooms. I cannot show any pictures yet as I have the moving in photos but not the sorted out ones yet.
Yvonne Here now has a fantastic space in her attic. I have an 8ft x 11ft room so it will take me some time to get it sorted.
I do have a new desk and chair and lots of bits and pieces that my family put together for me as a present for a big birthday I celebrated in July. It was a total surprise and is very much appreciated.
So after all that here are a few pics of cards that I made over the summer. I won't put them all up now just a few to show you what I've been up to.
Hugs,
Kay

 Wedding card and matching box.

 A card for a cheeky monkey who had a new baby brother.
A man's birthday card.

A family Wedding anniversary card (commissioned)

The insert for the above card.


My Birthday Prezzie.